I was so excited to see that the day after I got my sewing machines that the library was having an Open Lab. Again, open labs are times for you to bring the projects you're working on and get help with them. For most people, it's help to understand a pattern or something of the sort. For me, I needed help figuring out my new machine and whether or not it even worked.
I loaded up my sewing machine and took it to the library. I told her I hadn't even tried plugging it in yet, so I don't even know it if works. We opened it up, plugged it in, and the lamp came on.
We were off to a good start.
She told me my first order of business would be to clean the machine. I unplugged the machine and got to work. I borrowed a pair of long-nosed tweezers from another person in the group and a screwdriver and opened up my manual to the cleaning pages.
 |
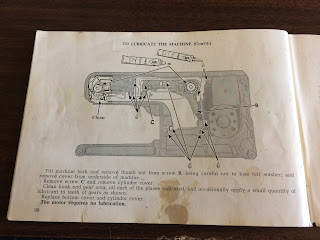
| Page 93 of my service manual |
Step one was to remove the bobbin case so I could clean underneath it (the hook raceway).
 |
| Removed the presser foot, needle, throat plate (top right), and open slide plate (bottom right) to access the mechanisms |
There was quite a bit of lint and dust accessible just in this section, so I grabbed what I could with the tweezers before moving on.
The tiny little screws on the bobbin case holder (black piece on the right) seemed quite troublesome. I decided to get a magnetizer to help remove these screws once loosened. (Also, it was quite exciting to see the marks of a screwdriver on the screws to see that my great-grandmother must have done this same process herself just as I was doing it now.)
 |
| Magnetized screwdriver helps remove the screws from the bobbin case holder |
 |
| Now I can remove the bobbin case holder |
Next, I removed the bobbin case.
 |
| Removed bobbin case |
This revealed quite a bit of dust and grime. I even found some old thread inside. I made sure to turn the handwheel to make sure I got access to all of the different parts of the race which rotates when you turn the handwheel.
Once clean, you reassemble everything back again. The manual made sure to note you have to make sure you replace the bobbin case against the positioning stud otherwise it could cause issues with the tension spring. One clue you haven't inserted the bobbin case correctly is that the bobbin case holder won't line back up with the screwholes. Make sure they line up properly before screwing back down.
(Note: I personally found it easier to screw the top screw first once properly aligned.)
 |
| Improperly aligned screwholes. Must readjust the bobbin case to fix. |
 |
| Once fixed, I find the top screw easier to replace first. |
At this point, you can go ahead and oil the hook raceway
or you can continue cleaning and then oil everything together at the end. I kept cleaning first.
Next, I removed the top of the machine case.
 |
| Two screws hold down the top of the case to the rest of the machine. |
 |
| Careful though, because this top keeps the side door in place! |
The top of the machine actually didn't seem to bad, but I did find more gunk and grime on the side opening. Tweezers helped a lot here. I kept a tissue nearby to wipe the tweezers clean as I went.
At this point, once I removed as much grime as possible, I started oiling and lubricating the machine. The instructor had some generic grease in a squeeze tube and a bottle of Singer oil she let me use. I was a little wary of the grease since the manual specifically says to use Singer lubricant, but I trusted the instructor wouldn't steer me wrong.
The instruction manual showed holes in the top case where you should apply oil. I lay the case on top to see where each of those holes lined up in reference to the mechanisms beneath. Pretty much, any moving part when you turn the handwheel needed to be oiled.
 |
| The crank on the left, the two stitch adjuster arms in the middle, the center of the cam, and the cranks on the right all needed oil |
The instructor warned me that a little oil goes a long way. One drop is all that would be needed to get it going. I did make sure all sides of the oiled parts seems to have oil after turning the handwheel and not just the point where I initially applied it.
There were also two pairs of gears accessible in the top that needed to be greased. One pair in the right-most compartment, and one just under the cable. Since the tube she gave me to use was super large, I put the grease on my finger and then applied the grease while turning the handwheel.
The side plate had lots of places that needed oiling. The needle bars and adjoining pieces move a lot (as I'm sure you know) while sewing. Since the bars move up and down, I made sure to get the entire length of the bars but I made sure to pay particular attention to all of the joints.
I also loosened the tension device as much as possible so I could try to remove the lint and fuzz between the discs.
 |
| Loosened tension mechanism to clean between |
Last was the underside of the machine.
 |
| Lay the machine back on its side to access the bottom panel |
I found it funny that the manual said to be careful not to lose the felt washer under the thumb screw in the middle of the bottom plate, but this machine is already missing its washer.
 |
| Removed bottom panel |
 |
| A screw to the left of the foot removes the rest of the bottom |
This area was also fairly clean, but there was old grease and gunk on the plate that I removed. This also allowed me to see how good of a job I did or didn't do under the hook raceway since the underneath of it is exposed here.
 |
| The grease looked like little bugs in the felt. I cleaned them off with tweezers. |
The bottom also had several areas to oil and new gears to grease.
 |
| Page 98 of the manual. I love the oil stains on this page! |
I discovered a storage bin in the free arm, and inside were four other cams and the little lint brush the manual mentioned.
 |
| I purchased the Singer lubricant, but everything else is my great-grandmother's |
The sewing instructor told me about the cams and how they allow you to use different stitches. The top panel opens up and shows you some of them.
 |
| Opened top panel to access and change cams |
The final order of business was to try it out!
The instructor gave me some fabric and thread. I wound a bobbin following the instructions in the manual and threaded the machine. The side door opens up to show you how to thread the top of the machine. It has way more places to put the thread than the machines the libraries use.
I tried out a few stitches, and it seems to work! The machine is a little loud compared to the machines at the library, but I'm sure that's just a technology difference.
 |
| My practice sewing piece trying out a few different stitches (a little hard to see the yellow thread on this) |
I am excited to see what this machine can do on my next project!


Comments
Post a Comment